Monday, April 25, 2011

Memory test Loop on restart, very interesting.


I had this issue working on a clients server recently.

Issue : Whenever the server ( Windows server 2008 Sp1 ) was rebooted , the memory diagnostic started running.

If you try to Use Esc key to kill it, the server would restart the diagnostic.

Resolution :

This Issue indicates that there may be problem with the hardware. After research and discussion with the client came to this resolution:

Removed the Memory diagnostic from the boot sequence using WinRE

bcdedit /bootsequence {memdiag} /remove .

This offers temporary relief as we can get the server to functional state.

Client will run hardware diagnostic on the server provided by hardware manufacturer.

Sunday, April 24, 2011

SBS log files & file locations.


This is a List if Important log files for SBS 2003. These are very helpful in troubleshooting issues with corresponding technology.

%sbsprogramdirectory% = c:\program files\microsoft small business server

%systemroot% = c:\windows

The location can be cut and paste into the “Run” Box


SBS2003

Log File

Location

Details contained

SBS Backup

%sbsprogramdir%\Support\BackupWizard.log

Issues related to Ntbackup and backup failure.

SBS SP1

%programfiles%\Microsoft Integration\Windows Small Business Server 2003\Logs\Errorlog.txt

Logs issues related to installation of Windows Small Business server SP1 (not windows SP1)

CEICW

%sbsprogramdir%\Support\icwlog.txt

Logs Failures while running ICW (internet connection wizard). Helpful in resolving all failures in ICW.

Exchange 2003 SP1

%systemdrive%\Exchange server setup progress.log

Logs the events in installation of Sp1 for exchange 2003

Windows 2003 SP1

%systemroot%\svcpack.log, %systemroot%\setupapi.log

Logs the events in installation of Windows server SP1

IIS Logs

%systemroot%\system32\LogFiles\W3SVC1

Logs all communication with IIS , Logs for directories are in specific folders. W3SVC1 in most cases would be Default website

ActiveSync.log

Server 2003\Logs\SBSMSI-ActiveSync.log

Logs ActiveSync activity


SBS 2008

Log File

Location

Details contained

CTIW.log

%sbsprogramdir%\Windows Small Business Server\Logs

Logs all activities in "Connect to internet" wizard

DPCW.log

%sbsprogramdir%\Windows Small Business Server\Logs

Logs all activities in "Setup your internet" wizard

ERRORLOG.TXT

%sbsprogramdir%\Windows Small Business Server\Logs

Logs all errors while installation or migration of SBS 2008. Useful in finding reason for failed migration

SBSSetup.log

%sbsprogramdir%\Windows Small Business Server\Logs

Similat to errorlog.txt . Logs all activity while installation or migration of SBS 2008. Useful in finding reason for failed migration

fncw.log

%sbsprogramdir%\Windows Small Business Server\Logs

Logs all activities in "Fix My Network" wizard

W3WP.log

%sbsprogramdir%\Windows Small Business Server\Logs\WebWorkplace

Logs activity realted to Web Workpalce which contains RWW , OWA , Exchange etc

Pop3service.log

%sbsprogramdir%\Windows Small Business Server\Logs\pop3connector

Logs all activities of POP3Connector wizard

Exchange connector logs

C:\Program Files\Microsoft\Exchange Server\TransportRoles\Logs\ProtocolLog

Contains logs for Exchange send and receive connector, helpful in troubleshooting issues related to Email Flow on the server.

Tuesday, February 1, 2011

How To Backup IIS 7.0 Configuration


This post will discuss the procedure to backup the configuration of IIS.

As a best practice , It is adviced to take a backup before making any changed to your system.However , taking a complete backup to make changed only to IIS would be unfair.

There may be many scenarios that you would like to take a backup of the IIS configuration. I have had multiple issues where I have seen IIS websites not working because of changes made to the settings like authentication type or SSL settings.

The following set of commands will enable you to take a backup of IIS and restore the same when needed.


To take a backup, Open Command prompt with administrator privileges

Change the directory to C:\Windows\System32\inetsrv

to take a fresh backup

run “appcmd add Backup ‘Name of Backup’ ”

To restore backup

“appcmd restore backup ‘Name of Backup’ ”

To see all available backups

appcmd list backup

Monday, January 31, 2011

DCOM


Distributed Component Object Model :

DCOM is next-gen Component Object Model (COM). DCOM allows an application's component reside on different computers, which means that the application don't need to be concerned that one COM object might be on the local computer and another might be across the LAN on the server or another workstation. DCOM thus provides location transparency, which simplifies developing distributed applications. DCOM isn't a self-contained and relies heavily on RPC to carry its work.


You may notice that when you get error “RPC server unavailable” , DCOM on one of the machines is unavailable. Fixing DCOM may Fix the RPC issue


DCOM is designed for use across multiple network transports, including Internet protocols such as HTTP. DCOM is based on the Open Software Foundation's DCE-RPC spec and will work with both Java language applets and ActiveX components through its use of the Component Object Model (COM).


Distributed Component Object Model extends the Component Object Model (COM) to support communication among objects on different computers—on a local area network (LAN), a wide area network (WAN), or even the Internet. With DCOM, your application can be distributed at locations that make the most sense to your customer and to the application.


Because DCOM is a seamless evolution of COM, you can take advantage of your existing investment in COM-based applications, components, tools, and knowledge to move into the world of standards-based distributed computing. As you do so, DCOM handles low-level details of network protocols so you can focus on your real business.


The benefits of DCOM:


  • Code Sharing and Reuse
  • Object Oriented Programming
  • Programming language-independent (C++, VB, Java, etc)
  • Prevents DLL mismatches
  • COM as a Binary Standard
  • Glue between interoperable components
  • Interfaces (collection of functions)
  • Components
  • In Process (DLLs)
  • Local
  • Remote (DCOM)


Other Features

· Communications between components, even across process and network boundaries

· Dynamic loading of components


COM


COM is used by developers to create re-usable software components, link components together to build applications, and take advantage of Windows services. The family of COM technologies includes COM+, Distributed COM (DCOM) and ActiveX Controls.


COM is used in applications such as the Microsoft Office , e.g. COM OLE technology allows Word documents to dynamically link to data in Excel spreadsheets and COM Automation allows users to build scripts in their applications to perform repetitive tasks or control one application from another.


Microsoft provides COM interfaces for many Windows application services such as Microsoft Message Queuing (MSMQ) Microsoft Active Directory (AD) and Windows Management and Instrumentation (WMI).


What is COM+?


COM+ is the name of the COM-based services and technologies first released in Windows 2000. COM+ brought together the technology of COM components and the application host of Microsoft Transaction Server (MTS). COM+ automatically handles difficult programming tasks such as resource pooling, disconnected applications, event publication and subscription and distributed transactions.

Replacing Registry hives


There are 5 registry hives , Namely


  1. SAM – Security accounts manager
  2. System
  3. Software
  4. Default
  5. Security

These are located in c:\windows\system32\config

When a system state backup is run on the computer, these hives are backed up and stored in c:\windows\repair.

If you made a change to the system or installed a new software , the server may go into a no-boot situation. This procedure is also helpful when your registry is corrupt. You may receive error on these lines:

“Windows  could not start because the following file is missing or corrupt: \WINDOWS\SYSTEM32\CONFIG\SOFTWARE or SYSTEM or its log.”


It is important to note that , once you have replaced the hives, your system will be pushed back to the configuration when you took the last backup. If you are not sure when you took the last backup, you must check the date on files in c:\windows\repair .

If you have not performed a backup since you promoted the server to Domain Controller, Do not use this procedure.

It is also possible to only replace one hive at a time , but since the hives are related , I would suggest replacing all in one go.


Steps to Follow


Boot with the Windows CD and go to recovery console

You need to enter the password , this is the first password that was entered when setting up the computer

type the following commands

cd windows

cd system32

cd config

This will take you to the following path

c:\windows\system32\config>

Now we need to rename the existing hives to .old so we can replace them with ones from repair folder

Run the following commands to rename the hives


ren system system.old

ren software software.old

ren sam sam.old

ren default default.old

ren security security.old

Once this is done , Navigate to c:\windows\repair , to do that , run these commands

cd ..

cd ..

cd repair


Once you are at c:\windows\repair>


run these commands to copy hives from repair folder to config folder


copy software c:\windows\system32\config

copy system c:\windows\system32\config

copy sam c:\windows\system32\config

copy default c:\windows\system32\config

copy security c:\windows\system32\config


Reboot the server to normal mode


If this does not work for you and you want to revert the changes, rename the files you copied from repair folder to hivename.old1 and rename the hivename.old  in config folder to hivename

Wednesday, January 19, 2011

Exchange Migration – SBS 2003 to exchange 2010 on STD 2008 server.


           Project Definition


1. Migrate SBS 2003 to windows server 2008 with exchange 2010

2. Set up DAG for disaster recovery


                               Current Environment

We have Windows SBS 2003 – one network card only

Hostname: Server

IP address: 192.168.22.155

Domain Info: 1corvette.local

Note : We have chosen not to move public folders to new folder.


Step 1 : Make sure the SBS 2003 is in a healthy state to be migrated

1. Check event viewer

Result – looks clean , no related errors reported

2. Run SBS BPA

Got errors

image

For more information and how to resolve the first issue refer http://support.microsoft.com/kb/315407

The other errors can be safely ignored


3. Run Dcdiag & netdiag to ensure healthy AD and DNS

Result : Both show no errors


4. Disable checksum offload on network card Refer : http://support.microsoft.com/kb/948496

Reboot required after hotfix install

5. Change exchange to native mode


Refer : http://support.microsoft.com/kb/327779

clip_image004


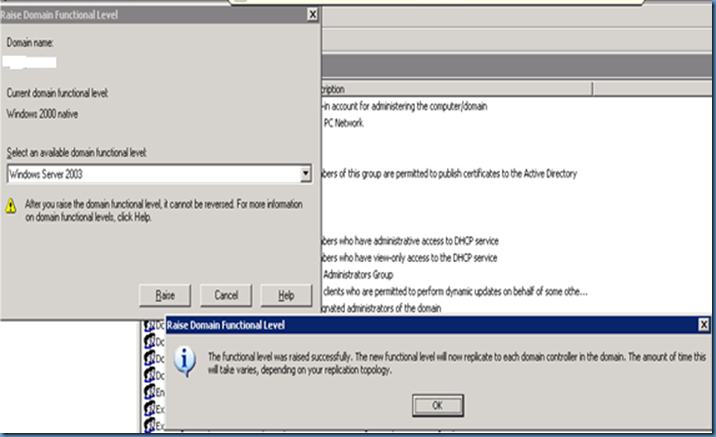
6. Raise Domain functional level & forest functional level

To raise the Domain Functional Level do the following:


  • Click Start > Administrative Tools > Active Directory Users and Computers
  • Right click on the domain name and select Raise Domain Functional Level
  • In the drop down box select Windows Server 2003 and click OK
  • To raise the Forest Functional Level do the following:
  • Click Start > Administrative Tools > Active Directory Domains and Trusts
  • Right click where it says Active Directory Domains and Trusts and select Raise Forest Functional Level.


image


image


Step 2: Introduce Windows 2008 server to the SBS domain.


Servername: CorvetteExch01

IP address: 192.168.22.163

1. Change DNS to point to SBS 2003

2. Add the server to the domain

3. Run Dcpromo to promote the server as ADC in the domain blackpt.local

clip_image009

4. Replicate DNS and AD . Wait for atleast 5 to 10 minutes


5. Run repadmin /syncall to confirm replication has completed


clip_image011

Once Completed successfully , Reboot the server.


6. Run the following commands to prepare windows server 2008 for exchange 2010 install

· D:\support\adprep\adprep32  /forestprep

· D:\support\adprep\adprep32  /domainprep

· D:\support\adprep\adprep32  /domainprep /gpprep


Step 3: Install exchange 2010


1. Open windows powershell from programs –> accessories

Run Import-Module ServerManager

Then run

Add-WindowsFeature NET-Framework,RSAT-ADDS,Web-Server,Web-Basic-Auth,Web-Windows-Auth,Web-Metabase,Web-Net-Ext,Web-Lgcy-Mgmt-Console,WAS-Process-Model,RSAT-Web-Server,Web-ISAPI-Ext,Web-Digest-Auth,Web-Dyn-Compression,NET-HTTP-Activation,RPC-Over-HTTP-Proxy –Restart

Then run

Set-Service NetTcpPortSharing -StartupType Automatic


2. Install required updates like Microsoft office filter packs.


3. Insert the exchange CD in the drive and open command prompt to run the following commands

· Run D:\setup /PrepareLegacyExchangePermissions

· Run D:\setup /PrepareSchema


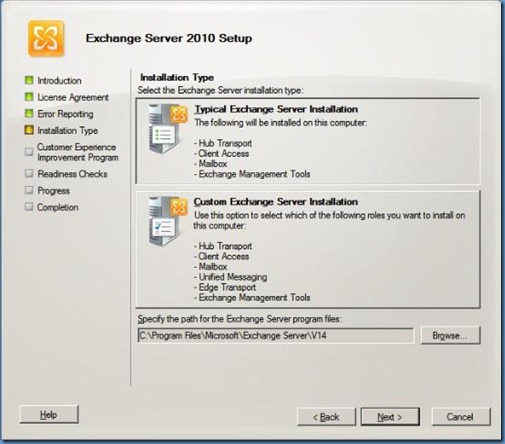
4. Then start the exchange 2010 Install
clip_image012


Choose a typical install


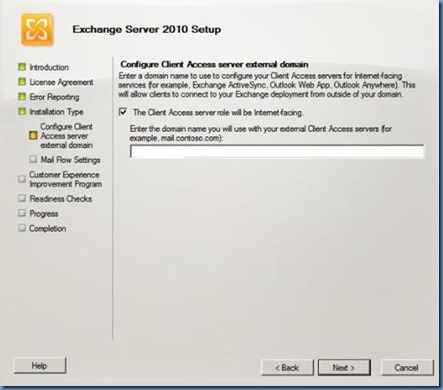
5. In the screen below

Check the box for “The CAS server role will be internet facing”

Enter the URL used to access OWA or the name on the certificate on Exchange
clip_image014


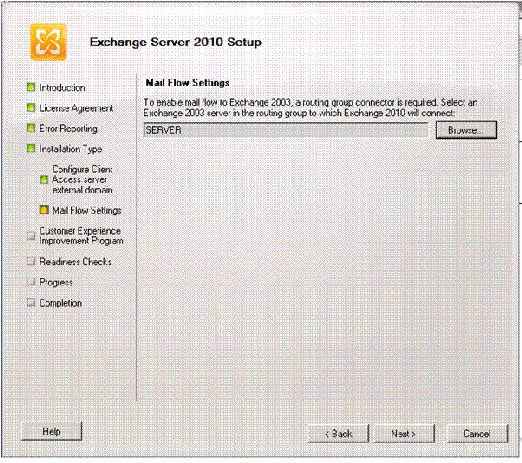
Click Next, In the screen you get below add the SBS 2003 server
clip_image016


clip_image018

Click Ok and then Next.

Hit next to complete the installation


6. Reboot server after completion

Once the server comes up make sure the connectivity between the two DC is fine and check event viewer for any errors.


Step 4 : Move data from SBS 2003 to Exch 2010  - Use the Move request

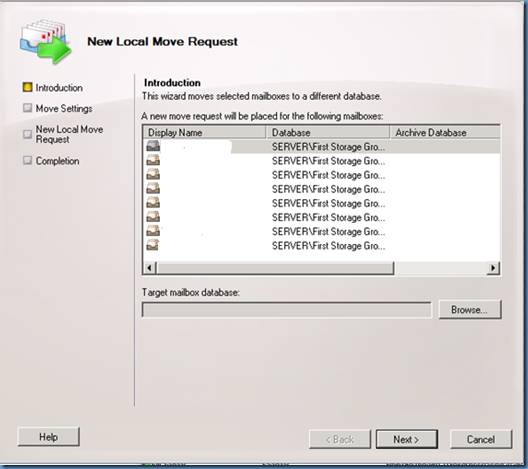
1. Open Exchange Management Console and navigate to Recipient Configuration > Mailbox.

2. Highlight the mailboxes you want to move

3. Right click and choose New local move request
image


4. Select the Exchange 2010 mailbox in the target mailbox

image


5. Click next and then New

This will move mailboxes to Exch 2010 one by one. The mailbox that is being moved will not be accessible. This process will take a long time and depends on how fast your disk system on SBS 2003 is.


6. You can go to the properties of any move request to see how much time the process took

clip_image026


Offline Address Book

Generate new OAB on Exch 2010 and set to default.


Migrate Public folders

In this migration we have decided not to move Public folders .

However this procedure is best performed Via .PST file transfer

If this can not be performed via .PST you can try the following

  • · Open Exchange System Manager
  • · Navigate to Administrative Groups > First Administrative Group > Servers > Server name > First Storage Group
  • · Right click on the Public Folder Store and select Move All Replicas.  The only option that should appear in the list is your Exchange 2010 server.  Click OK.


Certificate

A new certificate is created on Exchange 2010 when you install it. This will be the same certificate that is installed on SBS 2003

For a trusted certificate refer : http://technet.microsoft.com/en-us/library/dd351057.aspx


Uninstalling Exchange on SBS 2003

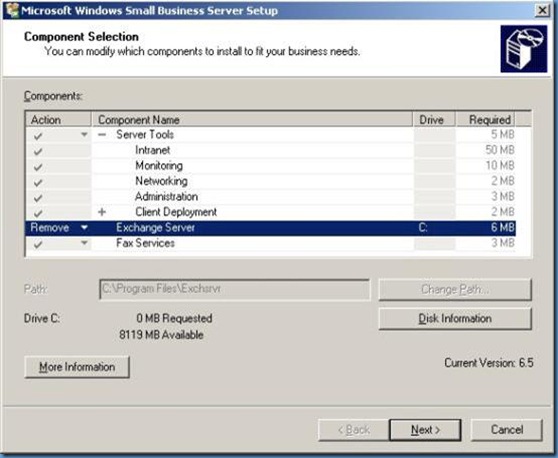
To do this click start –>  run  –>  appwiz.cpl. This will open add and remove programs window.  Highlight Windows Small Business Server 2003 in the list and click Change/Remove.
Click next on the Welcome screen, and next on the screen that follows.  Once the component screen opens pull down the drop down next to Exchange Server and select remove, as shown below. Then click next and next again.
clip_image028

To Manually remove exchange follow http://support.microsoft.com/kb/833396

Transfer FSMO roles

You can follow this article to transfer the FSMO roles

http://support.microsoft.com/kb/255504

Dcpromo SBS 2003 and remove from domain.

Change data base location – Exchange 2003


I am back to my loved blog after a long time during which I had a vacation and couple of Migrations . I was really exited about the SBS 2003 to exchange 2010 one , It was delivered in time without any glitches. I will cover that in coming posts.


Lets talk about something simple , moving exchange database location in Exchange 2003. You will need to do this if the drive with exchange database is running out of space.

Preparation

1. Create two new folders named MDBdata & MDBdata1 on the drive where you need to move the database. Make sure the NTFS permissions are same as c:\program files\exchsrvr\MDBdata

2. Copy the files pub1.edb , pub1.stm ,priv1.edb & priv1.stm to new MDBdata1 folder.

Move database path


1. Open Exchange system manager. Browse to the following location

Server –>  first storage group --> mailbox store

clip_image002


2. Dismount the store.


3. Right Click and select properties.


4. Go to database tab. You will see the path to the exchange database files here

clip_image004


5. Click browse and specify new location for the file as MDBdata folder. Perform this step for priv1.edb and priv1.stm file.

6. Click ok and exit.

7. Stop Msexchange system attendant and information store service.

8. Rename Mdbdata1 to MDBdata & vice versa.

9. Start exchange services and mount stores.

10. You can repeat the same procedure for public folder store.

Friday, November 26, 2010

License Issue: Clients unable to login to OWA


Descriptions of the problem:

Clients unable to login to OWA from inside or outside the domain.

Issue with all clients. Some clients have issues logging into the network.


Diagnosis:

Licenses were not available to users, the licenses issue was caused by low free disk space on c:\.

The authentication on Virtual directories in default website related to OWA was incorrect


Solutions :

Get error that username and password is incorrect when logging to OWA.

Also receive this warning on licenses issue.

clip_image002

The server was working fine and users were able to login normally few hours back the licenses should have been fine

Checked the licenses under licensing in server management.

Installed licesnses : 5

Maximum Usage : 1


Checked the disk space available


Total Size : 12 Gb

Free space: 117Mb


To retrieve licenses

1. Stopped the license logging service

2. Browse to c:\windows\system32

3. Renamed

4. Licstr.cpa à licstr.cpa.old

5. Autolicstr.cpa à licstr.cpa

6. Started license logging service

7. Went back to licensing in server management and saw that the licenses reappeared

image

To create space in c:\ moved the following files to a new folder under d:\

1. W3SVC1 folder which contains log files for IIS default website.

2. Downloaded updates

3. Drivers

Created 1.67 Gb of space.

Users still cannot login to OWA

1. Opened IIS console

2. Under default web site and OWA virtual directory, found that the authentication was incorrect.

3. Set it to default

virtual directory

Enable Anonymous Access

integrated authentication

Basic authentication

SSL required


Default Website

yes

yes


Exchange


yes

yes


4. Users able to login to OWA and network


Note : Product ID for windows SBS 2003 server is 74995-xxxxx-xxxx

If the server is OEM , you will see 74995-oem-xxxx

Sunday, November 21, 2010

Windows Small Business Server 2003 SP1


Windows server 2003 SP1 and Windows Small Business Server 2003 SP1 are two different service packs. If you are not sure about this, windows server 2003 SP1 is meant for all windows 2003 servers including Small Business Servers. Windows Small Business Server 2003 SP1 is a service pack for Small business server 2003 only.

How to check if Windows server 2003 SP1 in installed?


1. Click start , then run.

2. Type winver and hit enter.

3. In the new windows that comes up you can check the service pack level.

There are other ways to check the SP level , but this is my favourite.


How to check if Windows Small Business Server 2003 SP1 is installed on your server?


1. Open Regedit. Start – Run -- Regedit

2. Browse to servicepacknumber number under

HKEY_local_Machine\Software\Microsoft\small business server

3. If the key is absent or is set to 0 , the service pack is not installed. A value of 1 indicates that Windows Small Business Server 2003 SP1 is installed.


A thing worth mentioning here , in case you are migrating to SBS 2008 from SBS 2003 you will notice that SBS 2003 should be updated with Windows Small Business Server 2003 SP1. However , you may not know that you can create the above key and assign it a value 1 , and the SBS 2008 will not come to know that Windows Small Business Server 2003 SP1 is not installed and will let you continue.

Do I see a smile there. It’s a work around worth mention.

Now that there are no doubts about Windows Small Business Server 2003 SP1 lets shed some light on issues you may encounter while installing Windows Small Business Server 2003 SP1. If you are managing Microsoft products for some time not you should be aware that you are instructed by Microsoft to take a good backup. GOOD is the golden word here.

Let me share a recent exploit. I installed SP2 for exchange 2007 on a SBS 2008 without a online exchange backup, something went wrong with the install and on rebooting , exchange binaries were completely installed. This had happened before in a test environment. I did try to dig down to the cause and found a reasonable explanation. It’s a feature of windows 2008 servers where it rolls back to a restoration point in case of a failed install. My restore point must have ...... . . . aargh!


You need to install the following before you can install Windows Small Business Server SP1

1. Windows Server 2003 Service Pack 1

2. Windows SharePoint Services 2.0 Service Pack 1

3. Exchange Server 2003 Service Pack 1

4. Windows XP SP2 for Client Deployment


If your install fails you can refer setup.logs.

C:\Program Files\Microsoft Integration\Windows Small Business Server 2003\logs\setup.log.

If the damage is irreversible revert to backup. If not try to resolve the issue you found in the logs and install again.


Scenario 1:

Most of the issues are encountered with Client deployment.

Make sure the following is inplace

1. ClientApps folder is located in the root of C: drive. It may have been moved to a new location to free space in C: drive.

If it has been moved , move back to original location.

2. The permissions are default on c:\ , c:\ClientApps and HKEY_LOCAL_MACHINE\SOFTWARE\Microsoft\SmallBusinessServer\clientsetup

3. Check if all ClientApps components are installed in integrated setup, I bet they won't be, in that case install them.


Scenario 2:

"THIS COMPUTER CANNOT BE UPGRADED TO THE OEM VERSION OF SMALL BUSINESS SERVER"

You may get this error if you install SP1 on a OEM machine. Try these steps

1. Open Regedit and browse to HKEY_LOCAL_MACHINE \software\microsoft\smallbusinessserver\IsRunFromWeb.

2. Set the value to 0X1.

If this does not work try

1. Browse on the SBS 2003 server to C:\program files\Microsoft integration\windows small business server 2003

2. Locate suiteinfo.dll and go to the properties. Under resource tab expand string
If it is OEM version, it will have an entry that says 74995-OEM
If it is the retail version, it will say just 74995

If it still doesn’t work replace the file from a OEM machine.


Scenario 3:

Event ID: 11714

If you encounter this error, try the steps below

Event Type: Error
Event Source: MsiInstaller
Event Category: None
Event ID: 11714
Description:
Product: Windows Small Business Server Fax -- Error 1714. The older version of
Windows Small Business Server Fax cannot be removed. Contact your technical
support group.


Are you using SBS Fax.


Yes

Reinstall Fax from integrated setup.


No

1) Remove fax using integrated setup

2) Export and delete the following keys

HKEY_LOCAL_MACHINE\SOFTWARE\Microsoft\Fax

HKEY_LOCAL_MACHINE\SYSTEM\CurrentControlSet\Services\Fax

3) Rename the following files/folders

C:\Program Files\Microsoft Windows Small Business Server\fax

C:\Winnt\FaxSetup.log

4) Run client deployment again.

Saturday, November 20, 2010

SBS BPA(best practice analyser ) does not update


Have you ever used the SBS best practice analyser from Microsoft. If you have , you must be impressed with the depth it reached. It runs a few WMI queries to get you results that may astonish you.But there is a slight flaw with this program.

You may have observed that you ran the BPA and it showed some error , you tried your best to fix it and there is no other way to tackle the issue.However , the BPA is still showing that error.

The BPA goes through the event viewer for the last 24 hours, so its bound to pick up errors that you may have resolved.This just stumps a lot of people , and they ridicule the BPA before a second thought.

From here on , don't ridicule the BPA. understand why its behaving the way it shouldn't. If its shows the error you resolved and you need to show your adamant boss that the BPA shows no errors , you need to go ahead and clear the event logs or just let him know that the BPA will  not show the errors after 24 hours.

Tuesday, November 16, 2010

How to Backup and Restore Your SBS and Default Group Policies.

In Windows 2003 server we have 2 default policies

1. The default domain

2. The default domain controller policy

In SBS 2003 we have 7 additional Group Policies, In SBS 2003 R2 we have 3 more for WSUS.If the SBS Vista Update is configured there will be another GP.

There may be issues in the domain when a policy is corrupt or while fixing NTFRS issues you may lose the policies. DCGPOFIX will only get default policies back and you may have to restore from another SBS 2003 server. It is a good idea to backup your GPs in spite of having a regular backup program. Check the easy steps below to backup and restore Group Policies.


HOW TO BACKUP?

1. Open Group Policy Management Console (Start – Run -- gpmc.msc).

2. From within GPMC expand domain.local and then Group Policy Objects.

clip_image002

3. Right click on Group Policy Objects and select Backup All.

4. Specify a location and a description for your Backup.

clip_image004


5. Click the Backup Button. You will get a progress bar which will show the status of the operation.


clip_image005


And you have a backup of the GPs on your server.


Restore Procedure:

1. These are the two default GPs in windows server 2003 and are necessary to run the DC stably. You cannot delete these policies.


clip_image007


2. To restore these policies from GPMC, right click on Group Policy Objects and select Manage Backups.

3. Select the Group Policy object we want to restore and click on restore. You will only be allowed to restore one policy at a time. You can see the progress of the operation in the progress.

4. Once policies are restored you need to re-link them to their appropriate OU. All of the SBS policies are linked at the domain level while The Small Business Server Auditing Policy is linked to the Domain Controllers OU.

Monday, November 15, 2010

Troubleshooting Issues with Remote Web Workplace-Part 3


It has been a few days since the last blog. Lets gets started with this one right away.

You can get to the RWW page however you are unable to login.


Scenario 1: The login gets stuck at “LOADING”

You may rarely see this one across the domain. This error is specific to client machines.

This is surely a problem with your web browser. You may not be using IE , or cookies may be turned off or its not allowing add-ons.

If you have not done this already, add the RWW URL to trusted sites


Scenario 2: The Loop of login page

You provide correct credentials and it gets redirected to the login page again and again and again.

This may be a very common one.It can be resolved by doing either of the following:


Method 1: Configure the number of worker processes for the DefaultAppPool application pool to 1

  1. Open IIS manager (start à run à inetmgr), browse to Application Pools.
  2. On the work pane, go to the properties of DefaultAppPool.
  1. Under the Performance tab set the Maximum number of worker processes to 1.
  1. Click OK and run IISRESET from command prompt.

OR


Method 2: Create a new application pool for the remote virtual directory

  1. Under Application pools, in the Action menu, create a new Application Pool.
  1. Give the app pool a sensible name like RWWAppPool.
  1. Select Use default settings for new application pool option, and click OK.
  1. In IIS console , Expand Web Sites, expand Default Web Site, right-click Remote, and then select Properties.
  1. From the Application pools listed there, select the application pool that you created.
  1. Click OK and run IISRESET from command prompt.

The next post will be up soon.No screenshots were available.

Sunday, October 31, 2010

How to Change timeout for CompanyWeb, RWW, OWA websites in SBS 2008


By default in SBS 2008, companyweb is set to time out in 30 minutes if there is no user activity .Your organization may require a user to work all day in companyweb , and you may think that this time out is affecting productivity. The organization may have security concerns and may want to reduce the timeout

I list below simple steps to change the time out. But make sure you take a backup of the configuration before making any changes.

1) Open companyweb.

2) Click Site Actions and then click Site Settings.

3) Under Galleries section, click Master pages.

4) Right-click default.master, point to Send To and then click Download a copy and Save the file in a convenient location.

5) Make a backup copy of this file and open in notepad.

6) Once in notepad , click Ctrl+f and Locate “function EndSession”

It will look like this

//this value indicates after how many miliseconds

var LOGIN_SESSION_TIMEOUT_VALUE = 1800000;

function EndSession()

7) The time out here is specified in milliseconds , and you guesses it right the 1800000 value is the default timeout .

8) Modify the 1800000 value to the desired timeout.

9) Save the file. The file should not be saved as default.master.txt. but as default.master

10) In CompanyWeb , click Upload, and select the default.master file. Leave the box “Add as a new version to existing files” checked and click OK.

11) After the document is uploaded, click OK.

12) If you are having problems , then the file you uploaded is not default.master but default.master.txt.


How to change Idle time out for RWW


To change the client time-out setting for Remote Web Workplace . the default value is set to 30 minutes

1. Open Registry Editor and browse to

HKEY_LOCAL_MACHINE\SOFTWARE\Microsoft\SmallBusinessServer\RemoteUserPortal

If the RemoteUserPortal key does not exist , you can create it .Also make sure that you have the correct spelling in correct case.

3. Create a DWORD (32-bit) value named “PublicTimeOut “

4. In the Value data box, enter the number of minutes that you want to elapse before

the Remote Web Workplace session times out.

5. Click ok to exit.

To change the server time-out setting for Remote Web Workplace. The default value is set to 30 minutes:

1. Open IIS manager

2. 3. In the left pane, double-click the name of the server to expand the tree.

4. Double-click Sites to expand it, and then double-click SBS Web Applications to expand it.

5. In SBS Web Applications Home, double-click Session State.

6. In Cookie Settings, change the Time-out to the desired amount of time. The time is in seconds.

. Click Apply to save the changes.

How to set Idle time out for OWA


The Outlook Web App virtual directory must be configured to use forms-based authentication.

Using the Registry

  1. Open regedit on CAS (client access server) server and browse to HKEY_LOCAL_MACHINE\SYSTEM\CurrentControlSet\Services\MSExchange OWA
  2. Create new DWORD Value. In the details pane, name the new value PublicTimeout.
  3. In the Value Data box, type a value between 1 and 43,200. This value is in minutes.
  4. Restart The Microsoft Exchange Forms-Based Authentication service.

Important

  • If the client timeout value is GREATER THAN the server timeout value, The RWW page will log you off after the client timeout value and return you to the RWW logon page without displaying any message.
  • If you opened OWA from the link within RWW, the OWA page will also be logged off and returned to the OWA logon page when you click anything within OWA.
  • If the client timeout value is EQUAL TO or LESS THAN the server timeout value, The RWW page will log you off after the client timeout value and display a message indicating the same.
  • If you create a key named PrivateTimeout instead of PublicTimeout , it will affect the private/trusted computers. You can also use powershell to do the same.
  • OWA Public TimeOut, default is 15 minutes. OWA Private TimeOut default is 8 hours.
  • If you opened OWA from the link within RWW, the OWA page will remain open until the OWA idle timeout is reached (default is 15 minutes).
  • The RWW timeout does not affect the companyweb timeout.

Thursday, October 28, 2010

Troubleshooting Issues with Remote Web Workplace-Part 2

Continuing the post we will Troubleshoot some more scenarios where we can not get to RWW homepage and get an error.You can refer http://support.microsoft.com/kb/318380 to find cause and resolution to messages with error codes in them. We will discuss a few errors with error codes.


Error 1:
HTTP Error 403 – Forbidden
There are many versions of this error . So you need to go through the complete error and check what you need to Proceed with troubleshooting
image
If you get this error as well
You are not authorized to view this page
You might not have permission to view this directory or page using the credentials
you supplied.

  • Check the permissions In IIS console for remote virtual directory under directory security.make sure it is default
  • Check Documents in the properties of  Remote Vdir .Make sure Default.aspx is not missing .You can add Default.aspx if it is missing and you shoule be able to browse RWW.

Error 2:
HTTP Error 403.6 - Forbidden: IP address of the client has been rejected.
image
Open the IIS manager, under Web Sites, expand Default Web Site, Highlight Remote Virtual directory dir and click Properties.
Under Directory security tab, Under IP address and domain name restrictions, click Edit.
Select Granted Access and remove the IP addresses of any computers that you wish to allow access from the exceptions field.
Click OK to exit
 
Error 3:
403 Forbidden - The server denies the specified Uniform Resource Locator (URL). Contact the server administrator. (12202) Internet Security and Acceleration Server .
 

image
 
You will get this error only if you have a ISA server in the domain and it is blocking the requests.
Re-run the CEICW wizard and call in a seasoned tech if you still have issue.

Error 4:
The page cannot be displayed:

image 

Make sure you are using the correct fully qualified domain name (FQDN) in the URL to access RWW and that it resolves to the correct internet IP address for the SBS 2003 server.

Check if  ports 80 & 443 are open on the firewall between the server and the client from where you try to browse.

If this does not resolve the issue , run  Connect to internet wizard (CEICW / ICW )

  •       Launch connect to internet wizard.Click Next on the Welcome screen.
  •       On the Connection Type screen, select Do not change connection type and then click Next.
  •       On the Firewall screen, select Enable Firewall, and then click Next.
  •       On the Services Configuration screen, click Next.
  •       On the Web Services Configuration screen, select either of the following options 

                  A.      Allow access to only the following Web site services from the Internet and Remote Web Workplace

                  B.      Allow access to the entire Web site from the Internet


  • On the Web Server Certificate screen & Internet E-mail screen, select Do not change and then click Next.

Click Finish.

You should not receive “Page cannot be displayed” Error